Hi all! I have a really simple and festive amigurumi pattern to share with you all:


PUMPKINS! As you can see, I maaaaybe went a little overboard on making them. I really like fall, okay? So to share my love of fall to you all (and in time for Halloween) I’ve whipped together my notes and made this pumpkin amigurumi pattern.
Materials needed:
- 5mm crochet hook
- Worsted weight yarn in brown and orange (or whatever color you want!)
- Polyfil stuffing
- Tapestry needle
Main body:
With 5mm hook and (orange) yarn, ch 2
R1: 6sc in 1st chain (6)
R2: inc in each st (12)
R3: *sc, inc* (18)
R4: *2sc, inc* (24)
R5: *3sc, inc* (30)
R6: *4sc, inc* (36)
R7: *5sc, inc* (42)
R8: *6sc, inc* (48)
R9 – 16: sc around (total of 8 rows)
R17: *6sc, dec* (42)
R18: *5sc, dec* (36)
R19: *4sc, dec* (30)
R20: *3sc, dec* (24)
R21: *2sc, dec* (18)
R22: *sc, dec* (12)
Stuff the pumpkin here! Don’t stuff it too firmly – it should be kind of squashy.
R23: dec in each st (6)
Fasten off, leaving a long tail – 24 inches or maybe even longer depending on the weight of the yarn that you used. Thread the tail through the tapestry needle, sew through each of the remaining 6 stitches, and pull tight to cinch closed. Tie a knot, but DON’T cut the yarn!
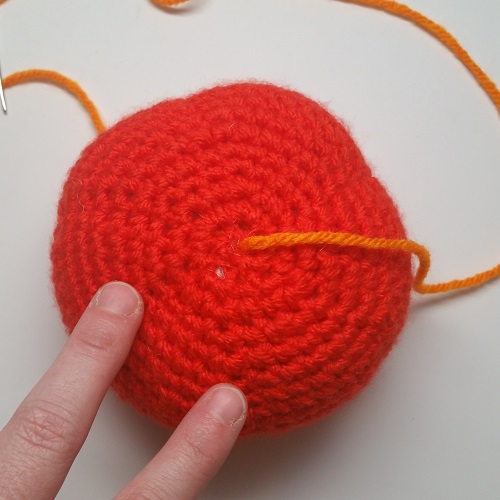
I’m using a lighter color so you can see better. Send the yarn straight up through that 1st chain you made and put the 6sc through. You’ll come up through this hole each time. Can you see how the increases made a sort of hexagon shape? This is the line you’ll cinch the pumpkin on. I put my fingers on two of the “lines” in this picture.
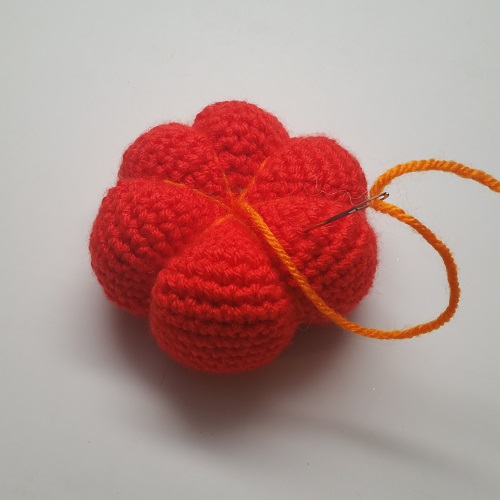
Lay your yarn flat along the line, then sew through the cinched hole in the bottom. Come straight back up, and pull tightly, making one wedge of the pumpkin.

Continue sewing like this on each line, cinching the yarn tightly to make the wedge. Once you’re all done, it’ll look like this:
Tie another knot, and weave the tail in!
Stem
In brown, ch 2
R1: 6sc in first ch
R2 – R4: sc around.
Fasten off, and leave a tail for sewing (6 inches should do it!)
Lightly stuff the stem, then sew it in the center of the top of the pumpkin body.
All done!
I’d love to see your finished pumpkin – comment a link to your blog with a picture, or tag me on Instagram @craftchampion!
As always, please don’t redistribute or sell this pattern as your own! You can share it, but please link back to my blog or share from my blog. You can also sell anything you make on a small scale, giving credit to me as designer.
Thanks for stopping by, and happy crafting!
-Missy


Would it be ok if I translated your pumpkin pattern to Icelandic and distributed it in my library knitting group? I would of course credit you and link to your website
LikeLike
Of course! I’d love to see pictures of your finished projects and your group!
LikeLike
The best pumpkin pattern – Thank you for sharing!
LikeLike
Is there a printer friendly copy? I have trouble using computer when crocheting. Thx x
LikeLike
Hi there, I am new to crochet and am working on your adorable pattern. I have a quick question about the decreases. How do I know how many stitches are in each round? I’m sorry if this is a dumb question 🙂
LikeLike
SO, I’m 90% sure on this: that the decreases are the same as the increases. So, after Rounds 9-16 are just regular (not increases or decrease, then you’ll start decreasing exactly the same number of stitches as you did for the comparable increase.
This is cause you start out with a 6sc in the ch2, so you’re just increasing by 6 sts each inc round, so you do the same for the Dec rounds. The only rounds you’re not increasing or decreasing are R1, R9-16 and the last R23.
e.g.
R9 – 16: sc around (total of 8 rows)Because we’ve just finished a straight SC round
ACTUALLY THIS IS “ROW 8-15” (although it says R9-16, R stands for Round not Row–so that messes some people up) SEE, R1 ISN’T REALLY A “ROW”, but it is a “ROUND”, IT’S THE PART AT THE TOP (OR BOTTOM DEPENDING ON HOW YOU LOOK AT IT LOL) THAT’S NOT MAKING A STRIPE (IF YOU USE ALTERNATING COLORS)
R17: 6sc, dec 48
R18: 5sc, dec 42
R19: 4sc, dec 36
R20: 3sc, dec 30
R21: 2sc, dec 24
R22: sc, dec 21 *
LikeLike
Whoops, I’m so sorry I made a typo on R22 !!!
I meant 18 not 21, SORRY!
Hey, After I stuffed it, I “saw it” so you’ll see it too! How you do 1 more Dec round after staffing and bind off cause that’s the end–
Plus, weaving in the end helped a LOT to make it look the same on both sides–
So, at R23 you should end w/ 12 sts
R23: sc, dec (12)
LikeLike
OMG Sorry AGAIN!!! I think the R23 is actually a Dec
In my 1st comment ere I said R23 is not a Dec round, but I think it is.
I’m so sorry to over-comment! I just didn’t wanna make it worse–now my yarn’s tangled around the cat and I can’t find my crochet hook!!! lol Happy Halloween everybody! 😉
LikeLike
Hi! I know this article is from 2018, but if I wanted to put little safety eyes onto my pumpkin, do you have any recommendations on where to put them at? Thank you!
LikeLike
Hi! I would probably add them so they fall right over the places where you’ve cinched the pumpkin, and about halfway down. I’ve never added safety eyes to one before, so you might want to experiment a bit! Sometimes I’ll stuff a project completely, then push the safety eyes through and get them lined up to see what’s cutest. Then unstuff and attach the eyes! Hope that’s helpful!
LikeLike
12 inch tail?!?! It wasn’t even close to being long enough.
LikeLike
Ah, perhaps underestimated the length of the tail back in 2016 when I wrote this pattern. I’ll add a quick correction. I hope you still enjoyed the free pattern!
LikeLike
Hello!!
I was wondering how you would recommend doing the stripes for the pumpkin!
Thank you!!
LikeLike
Hey! I personally like striping colors every other round – that’s how I made the black and orange striped pumpkins pictured. However, I think larger stripes might also look nice, so consider changing colors every two rounds even for a wider stripe. Hope that helps!
LikeLike
Would it be ok if i use this pattern to donate for my son’s school? They are holding a silent auction and his class is making a “fall box”
LikeLike
Absolutely, thanks for asking! I hope it does well in the auction!
LikeLike
HI! I LOVE THESE PUMPKINS! I have tried a few different pumpkin patterns from the web/youtube and this pattern is my favorite. It’s not too complicated and it looks neat and the stitches are tight all the way to end. Many patterns end up looking loose/open in the decreases.
Do you have any suggestions for adjusting the size of the finished pumpkin? I tried just adding some rows to make a bigger one but it doesn’t pull together as well when you add the string.
Thank you for sharing all your amazing patterns with the world. I’ve used several for my decor and am hoping to make several more.
LikeLike
Hey, thanks for commenting, it’s really nice to hear from folks who make my patterns! To make bigger (or smaller!) pumpkins, I’d suggest adjusting the increases at the beginning. This one increases up to 6sc, inc – so for a larger pumpkin, keep increasing in that same pattern by adding 1 more single crochet stitch before the increase. I’ve made JUMBO pumpkins by going up to 12sc, inc. Then, for the body of the pumpkin, I like to add 2-3 more rounds than the single crochet number for the increase. So for the jumbo pumpkin I mentioned above, I’d do about 14 rounds of single crochet (12 + 2 additional rounds) before I begin decreasing again.
Of course, you’ll also want to increase the amount of yarn at the end to cinch the wedges on your pumpkin the bigger you go – just a head’s up!
Happy crocheting, and of course, feel free to drop a line if you have any other questions! 🙂
LikeLike
At the end of each row, are you supposed to slip stitch into the first single crochet?
LikeLike
This pattern doesn’t used joined rounds – instead, work in a continuous spiral of single crochet. To start the next round, simply remove your marker and make the first stitch directly into the previous round’s first stitch, then mark the stitch you just created as this round’s first stitch. No slip stitching required!
LikeLike
This was an awesome project! I really enjoyed it! Thanks!!!!!!
LikeLike