Hi all! Haven’t posted in a while, as I’ve not been making patterns or really feeling very creative since my big move to Dallas last summer (and the new job – being a teacher can be pretty time consuming!). The school year is just about done for me, and I’ve been crocheting more in my spare time – so I thought to write down what I’ve been working on the last few days!
It’s been a process; usually I’m pretty lucky when it comes to designing pieces, and the first go at an idea results in a decently successful project that I can publish. NOT THIS TIME! It took me three attempts to get this pattern right. Here’s the first attempt:
I mean, he was cute, but he sort of looked like a deformed bear. I don’t know what I was thinking, other than I was trying to avoid having to sew his head to his body. So if you came here to make a potato bear, sorry – I didn’t bother writing this guy’s pattern down, and he was promptly frogged.
My second attempt went better – I used Bernat’s Softee Baby again and made the body in two separate chunks. Went WAAAAY smoother, even though I had to sew more.

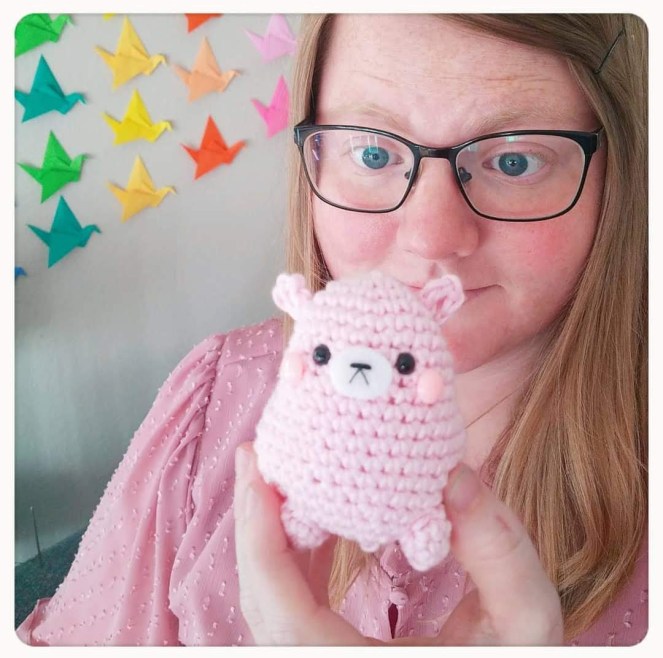
He fits in the palm of my hand, which was cute – but still not big enough for my personal taste. I switched to worsted weight yarn (“I Love This Yarn!” from Hobby Lobby in minty, if you’re curious) and added a bow tie. And lo, he was born:

Ingredients:
- worsted weight yarn
- white felt, cut in an oval about half an inch in width
- black embroidery thread & sewing needle
- hot glue gun (to attach felt mouth and decoration)
- 6mm safety eyes
- 5mm crochet hook
- polyfil stuffing
- yarn needle for attaching bits and weaving in ends
- Ribbon bowtie or ribbon flowers or other things to decorate with (I got the ribbon flowers from Daiso and the ribbon bowtie from Hobby Lobby)
Body
6ML
R1: inc in each st
R2: *sc, inc* around
R3: *2sc, inc* around
R4 – 13: sc around (10 rounds total)
R14: *2sc, dec* around
R15: *sc, dec* around
Stuff here. Don’t overfill, but add just enough to give the body shape.
R16: dec in each st
Fasten off and cut a 6in tail and use it to sew closed the remaining sts.
Head
6ML
R1: inc in each st
R2: *sc, inc* around
R3 – R8: sc around (6 rounds total)
R9: *sc, dec* around
R10: sc around
Slp st to next st, then fasten off. Leave a long tail to sew head on to body. Eyes go in between rounds 6 & 7 and are about 4 sts apart – but before you attach, now is a good time to make the felt mouth, as I like to use it to position the eyes for maximum cuteness. 
Run 4-5 straight stitches with the black embroidery floss to make the nose – then run 1 straight stitch from the center of the nose diagonally out to make the mouth. Use the picture above for reference. The eyes should sit just outside of the mouth. Trust me on this one – it looks really wonky if the eyes are too far away from the felt oval. Hot glue the mouth, then affix eyes. Stuff head – again, don’t stuff too much or his eyes will bulge and he’ll look decidedly un-cute.
Attach the head to the body – R1 is the front of the body, so the head should be attached to that side with the face facing forward. I set my head back a bit from the front of the body on my mint alpaca so there was room for the bowtie. If you’re not adding a bowtie, I would scoot it more forward to the front of the body. Here’s a side by side of both alpacas I made, so you can see how much forward the head is on the smaller white alpaca. You can also hot glue the decoration on now, since your glue gun is all fired up. I affixed the bowtie to the next, and on the white alpaca added the flower to the left ear.


Ears (make 2)
6ML
R1: sc, inc, sc, slp st.
Fasten off and leave a tail for sewing. Fold the ear in half, then sew through the bottom to help it keep that closed shape. Attach each ear to the top of the head, in line with the eyes.
Feet (make 4)
6ML
R1: sc in each st
R2: sc in the next 4 sts, slp st to next st. Lightly stuff (you won’t need much – you can also use the string from the ML cast on to stuff)
Fasten off and leave a long tail to sew each foot on to the body. Attach to underside of body – be careful and triple check that the feet are lining up and are set evenly on the body. I like to pin the feet on all at the same time and stand the finished project up to make sure I didn’t accidentally sew one in the wrong spot.

Finished! I hope the instructions were clear – I didn’t get a chance to take many pictures along the way, as I was frustrated on having to frog and make it again and again. Let me know how it turns out – I’d love to see the finished project on IG. Tag me @pixeledpeach or @ me in the comments so I can see! (If you need any help, IG is the best place to get ahold of me too.)
LEGAL STUFF:
Please don’t be a jerk and sell this pattern to anyone! Please don’t copy the pattern and share it – just share my blog! And feel free to sell any finished projects made with this pattern; just give me a shout out as creator in the product description.


That is adorable!! Congrats on the new job!
LikeLike
Thank you! It’s been a big transition for me!
LikeLike
Wow..so clear..thanks
LikeLike
How do you do your decrease?
LikeLike
I single crochet two stitches together – so first, I’ll start a single crochet, but before I pull through the last two loops, I begin the single crochet after it. Then I pull the yarn through all loops and single crochet them together.
Hope that helps!
LikeLike