Hey hi hello everyone! I think I mentioned it before on my Peach Amigurumi Tutorial – but I am so excited for spring. The weather lately has been tricking me into thinking it’s later in the year than it actually is! So when the weather is warm, my mind turns to planning the vegetable garden, mowing the lawn, and basking in some warm sun rays.
That also reflects in what’s on my crochet hook, too! And naturally, when I think of springtime, I also think of Easter. I adore the pastels of Easter decorations -between the cute dyed eggs and dusty, gentle colors of the chocolate wrappers.
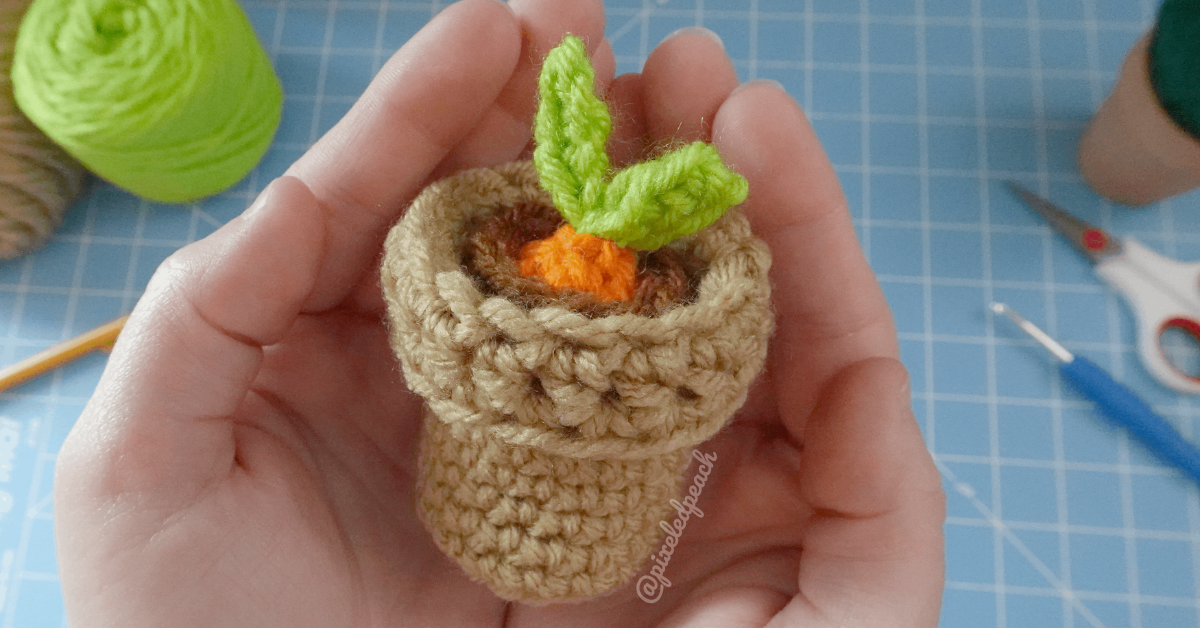
What’s more Easter-y than the Easter Bunny? And when I think Easter Bunny, my gardener’s brain instantly jumps to carrots.
However, it’s still February, and even though some of the days are warmer now, it still dips below freezing most nights where I am. I’ll probably only need to wait two more weeks to start gardening – but I want to garden now!
And thus, this carrot “peeker” was created.
“Carrot…. peeker?”
Yes, that’s right! I love the way the little carrot sort of peeks out of its little pot, so I included it in the name. I thought that this guy would be a great addition to an Easter basket, or a gift for your garden-minded friend. The best part? The carrot can be harvested and replanted as many times as you want!


It would also make an excellent sensory gift for a little one! They can work on motor control by plucking and replanting the carrot. It’s super soft and squishy, too, and can be chucked in the wash (preferably in a delicates bag) after play.
Video Tutorial
As with most of my newer patterns, here is the video tutorial – below, you’ll find a rudimentary written out pattern to follow.
I highly recommend using the video and the written pattern together, especially if you’re a beginning crocheter who’s not used to reading patterns, but also during some of the trickier bits on the pattern’s construction. You know how they say a picture’s worth a thousand words? A video is worth a thousand pictures!
If you view the video directly on YouTube, you’ll be able to see all of the time stamps for each section.
Pattern
Materials Required
| Worsted weight yarn in orange, dark brown, light green, and light brown |


| 4mm crochet hook |
| stuffing |
| scissors |
| tapestry needle |
| stitch marker |
Abbreviations:
Some of these may not be used in the pattern – these are the stitches that I use most frequently! If you see an abbreviation that you are unfamiliar with, please refer back to this chart.
| ML | magic loop |
| R | row/round |
| st | stitch |
| slp st | slip stitch |
| ch | chain |
| sc | single crochet |
| hdc | half double crochet |
| dc | double crochet |
| tr | treble crochet |
| FLOsc | front loop only single crochet |
| FLOscdec | front loop only single crochet decrease |
| FLOhdc | front loop only half double crochet |
| BLOsc | back loop only single crochet |
| BLOscdec | back loop only single crochet decrease |
| inc | increase |
| dec | decrease |
| dc | double crochet |
| * * | repeat |
| ( ) | number of sts in row |
Pot
Use light brown yarn
| R1: ML 6sc (6) |
| R2: inc in each st (12) |
| R3: *1sc, inc* around (18) |
| R4: slp st to 1st st of R3, ch 1, BLOsc around (18) |
| R5 – R10: sc around [6 rounds total!] |
| R11: FLOsc around |
| R12: sc around |
| R13: slp st to 1st st of R12, ch 2, turn work and FLOhdc around (18) |
| R14: slp st to top of ch 2 from R13, ch 1, sc in each st around (18) |
Fasten off by slp st to top of ch 1 of R14. Cut tail, then weave in end inside the hdc row of the brim of the pot.
Soil
Attach dark brown yarn to the loops left inside by R11’s FLOsc.
R1: ch 1, dec, *1sc, dec* around. End by placing sc in same st as ch 1 (18)
Fasten off by slp st to top of ch 1. Cut tail, then weave in end inside the dark brown material you’ve just crocheted.
Carrot
Use orange yarn
| R1: ML 3sc (3) |
| R2: inc in each st (6) |
| R3: *1sc, inc* around (9) |
| R4 – R6: sc around [3 rounds total!] |
| Stuff carrot here! |
| R7: *1sc, dec* around (6) |
Fasten off by slp st to the next st, then cutting long tail and pulling through. Use tail from carrot to sew through each remaining st, then pull to cinch closed. Weave in tail inside carrot.
Leaves
Use light green yarn
| R1: ch 4 |
| R2: turn, then sc in next 2 sts. Slp st in last ch st. |
| R3: ch 4 |
| R4: turn, then sc in next s sts. Slp st in last ch st. Slp st to R2’s slp st. |
Fasten off by cutting long tail and pulling through. Pull slip knot’s tail through loop, too. Thread tapestry needle with slip knot tail and weave in to the carrot’s body. Thread tapestry needle with long tail from leaves and use tail to sew leaves to body. Weave in any remaining tail into carrot.

-Missy

