If you’ve ever made one of my patterns before, or watched any of my tutorial videos, you’ll know: I’m not a huge fan of working with black yarn. I’m sure other crocheters will agree – it’s hard to see your stitches, and if you’re crocheting with poor lighting or at night (as I frequently do) it really does feel like crocheting on extreme mode! However, there are a few places when I’m willing to make the exception, and this little guy fits the bill.
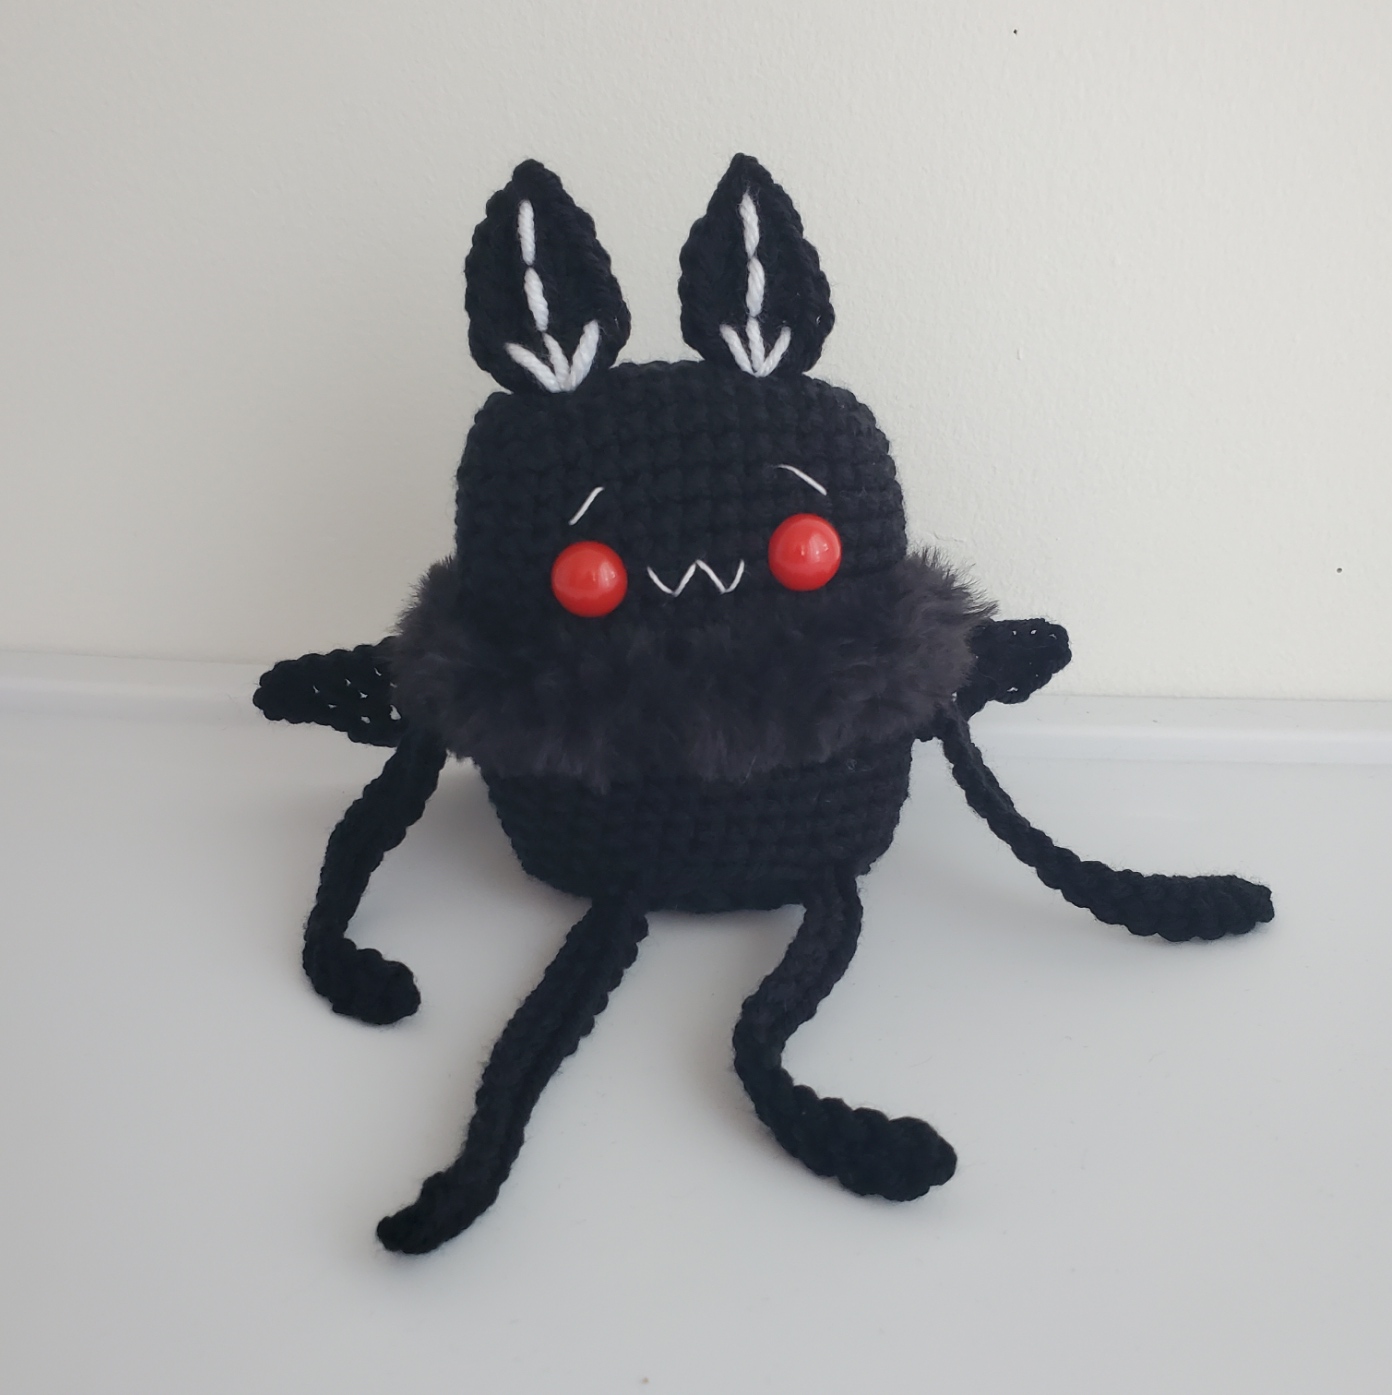
I wanted to try to create a larger version of my little Mothman standees, and one that would be easier for others to make (and not involve a ton of felt, like my other plushies tend to do now that I have a Cricut machine) – so I made every element of this pattern (except his eye) via crocheting, even his wings! I hope you like making him as much as I loved designing him 💕
YouTube Pattern Video
Below you’ll find the pattern video. I use YouTube’s “Chapters” feature to sort each individual instruction (rounds, sewing, sections, etc.) into a time stamped section. You should be able to see the chapters in the timeline/seek bar of the video below, but if you click over to YouTube, you’ll be able to pull the chapters up and move more easily between them.
As always, with the pattern write-up here on my blog, the written instructions are “bare bones” – they’re designed to work hand-in-hand with the video tutorial, so there aren’t a lot of images or descriptive language. If you’re having any issues, please refer to the video! I work hard to make them as clear as possible.
If the video still doesn’t answer your questions, drop me a comment here on the blog or over on the video on YouTube, and I’ll see if I can help you out. 👍
Concepts
I would grade this pattern as a beginner+ level pattern:
- You need to know how to tie a slip knot and chain. I won’t cover how to do this in the video tutorial.
- You’ll also need to know how to make sc, hdc, dc, and slp stitches. Again, I won’t cover how to do this in the video tutorial.
- We’ll be fastening on to some loops left behind on the body of our work – I’ll show you how to do this, but being familiar with the technique is a plus!
- We’ll also be working with black yarn and black faux fur yarn, which are a bit tricky to work with for beginners who are still trying to master the basics.
That all being said, don’t be afraid to give this one a try! I do my best to guide through all difficult concepts 😍
Materials
- Worsted weight yarn in black, and a little in white (just for some embroidery – maybe a yard at most!)
- Black faux fur yarn for the ruff
- 1 pair of 15mm red safety eyes – I get mine from here and use them for all sorts of other projects, so might be worth picking up a set!
- White embroidery floss, but white yarn works in a pinch too
- 4.5mm crochet hook (or whatever size you need, based on the weight of yarn you choose)
- Your standard amigurumi items: tapestry/yarn needle(s), stitch marker, scissors, stuffing
- Optional: Pet slicker brush – I use this to help fluff up the faux fur on the ruff!
Pattern Notes
All of my patterns are written with US terminology.
As with most amigurumi projects, your work will be formed by crocheting in a continuous spiral, with a stitch marker marking the beginning of each round. Any other construction style will be indicated in the pattern!
Abbreviations
These are my most commonly used abbreviations. Any special stitches or exceptions will be denoted in the pattern as they appear!
| rnd(s) | round(s) |
| sc | single crochet |
| MR | magic ring |
| ( ) | number of stitches at the end of each round |
| * * | repeat instructions, in the order they appear, the indicated amount of times |
| inc | increase (typically single crochet – otherwise denoted) |
| BLO | work in the back loop only |
| FLO | work in the front loop only |
| slp st | slip stitch |
| dc | double crochet |
| hdc | half double crochet |
| ch | chain |
| st(s) | stitch(es) |
| YO | yarn over |
Pattern
Antennae, make 2!
With black yarn, ch 6 sts
In 2nd ch from hook, slp st – then, continuing down the ch, place 1 sc, 1 hdc, 1 hdc + 1 dc in same st. In the last st (your slip knot!), place 3 dc, which will help flip us over to the other side of the chain.
Working up the other side of the chain, place 1 dc + 1 hdc in the next st, then 1 hdc, 1 sc, 1 slp st. To close the top of the antennae, place 1 sc in the 1st slp st.
Then, working down the center of the antennae, slp st through each foundation ch – at the bottom of the antennae, place your last slp st in the 2nd of the 3 dc we made. Cut a long tail to sew with, YO, and draw tail through last loop.
Body
With black yarn, ch 12 sts.
Rnd 1: In 2nd ch from hook, 1 inc, 9 sc down ch, 3 sc in next st, now working up other side of ch, 10 sc (24 sts)
Rnd 2: 2 inc, 9 sc, 3 inc, 9 sc, 1 inc (30 sts)
Rnd 3: *1 sc, inc* x 2, 9 sc, *1 sc, inc* x 3, 9 sc, 1 sc, inc (36 sts)
Rnds 4-11: 1 sc in each st around [8 rnds sc total!]
Now is a good time to place the safety eyes. They go on the front of the body (body is sort of a little rectangle shape at the moment – fold it flat to help you locate the front and back!), in between Rnds 7 &8. I like mine to have 4 sts between them so I can sew the mouth between – space them however you wish, just be sure they’re centered on the front of the body!
Rnd 12: 1 sc in each BLO around
Rnd 13: Time to add the arms! Place 1 sc in each st until you’re even with the 1st side of the body (helps if you fold the body flat to find the sides!). Then, ch 17 sts. Starting in 2nd ch from hook, 16 sc up the ch to form the first arm. Decrease the stitch at the base of the ch with the next stitch, then continue sc around until you reach the other side of the body. Repeat, by ch 17 sts, 16 sc down the ch, and dec. the stitch at the base of the chain with the next st of the rnd. Then, finish the round by placing 1 sc st in each remaining st. This is a good place to watch the video, if you’re feeling a little unsure about the “sides” of the body!
Note: When working the arms, I prefer YOYO sc sts rather than YUYO stitches. I find the arms “twist” when you use YUYO stitches, but will lay flatter with YOYO sts!
Rnds 14-18: 1 sc in each st around [5 rnds sc total!]
Rnd 19: Time to add the legs! Place 1 sc in each st until you’re even with the first eye – then, ch 17, and 16 sc down the ch (just like the arms, with the decrease at the bottom!). Place 1 sc in each st until you’re even with the second eye, and create a second leg just like the first by ch 17 sts, then 16 sc down ch. Finish up the round by placing 1 sc st in each remaining stitch.
Rnd 20: in BLO, *4 sc, dec* x 6 (30)
Rnd 21: *3 sc, dec* x 6 (24)
Rnd 22: *2 sc, dec* x 6 (18)
Now is a good time to add stuffing! Send plenty to the corners of the head (sort of a pleasing Pop-Tart like shape 😍) – but be careful not to over-stuff. He should be sort of flat up top and then round off at the bottom along the FLOs we left behind in Rnd 20.
Rnd 23: *1 sc, dec* x 6 (12)
Rnd 24: dec in each st (6)
Fasten off by slp st to the next st, then cut a medium tail to sew with (approx. 12 inches or so!). Use this tail to sew through all 6 of the FLO from the last rnd. Pull your tail tight to cinch this round closed, tie a knot, and weave this tail in. Cut any excess!
Attaching antennae and details
Time to get the antennae attached! They’re placed directly on the top of the body, right along that foundation chain. I sew mine even with the eyes. Use the tails left over from fastening them off to attach them – whip stitch a few stitches into the body and through the very bottom of the antennae, then tie a knot to secure and weave in the tails, trimming all excess.
For the detailing, use a little white yarn. I leave a tail of the white on the outside of the body to tie back on to at the very end (for more info on that, check out the video tutorial!) – First, sew two evenly spaced straight stitches, about two slp sts in length – up the center of the antennae, then on the way back fill in the space you left. We’re doing this very carefully, since the back of the antennae is visible, too – check out the video tutorial for exactly how I do this! Then, coming out of the same stitch you started the center “vein,” sew two diagonal stitches, forming a little “v” shape at the bottom of our 3 stitch “vein.” Tie off the remainder of the white yarn to the tail left on the outside of the body, then pull the fabric of the body up to send the knot to the inside. Repeat on the opposite ear.
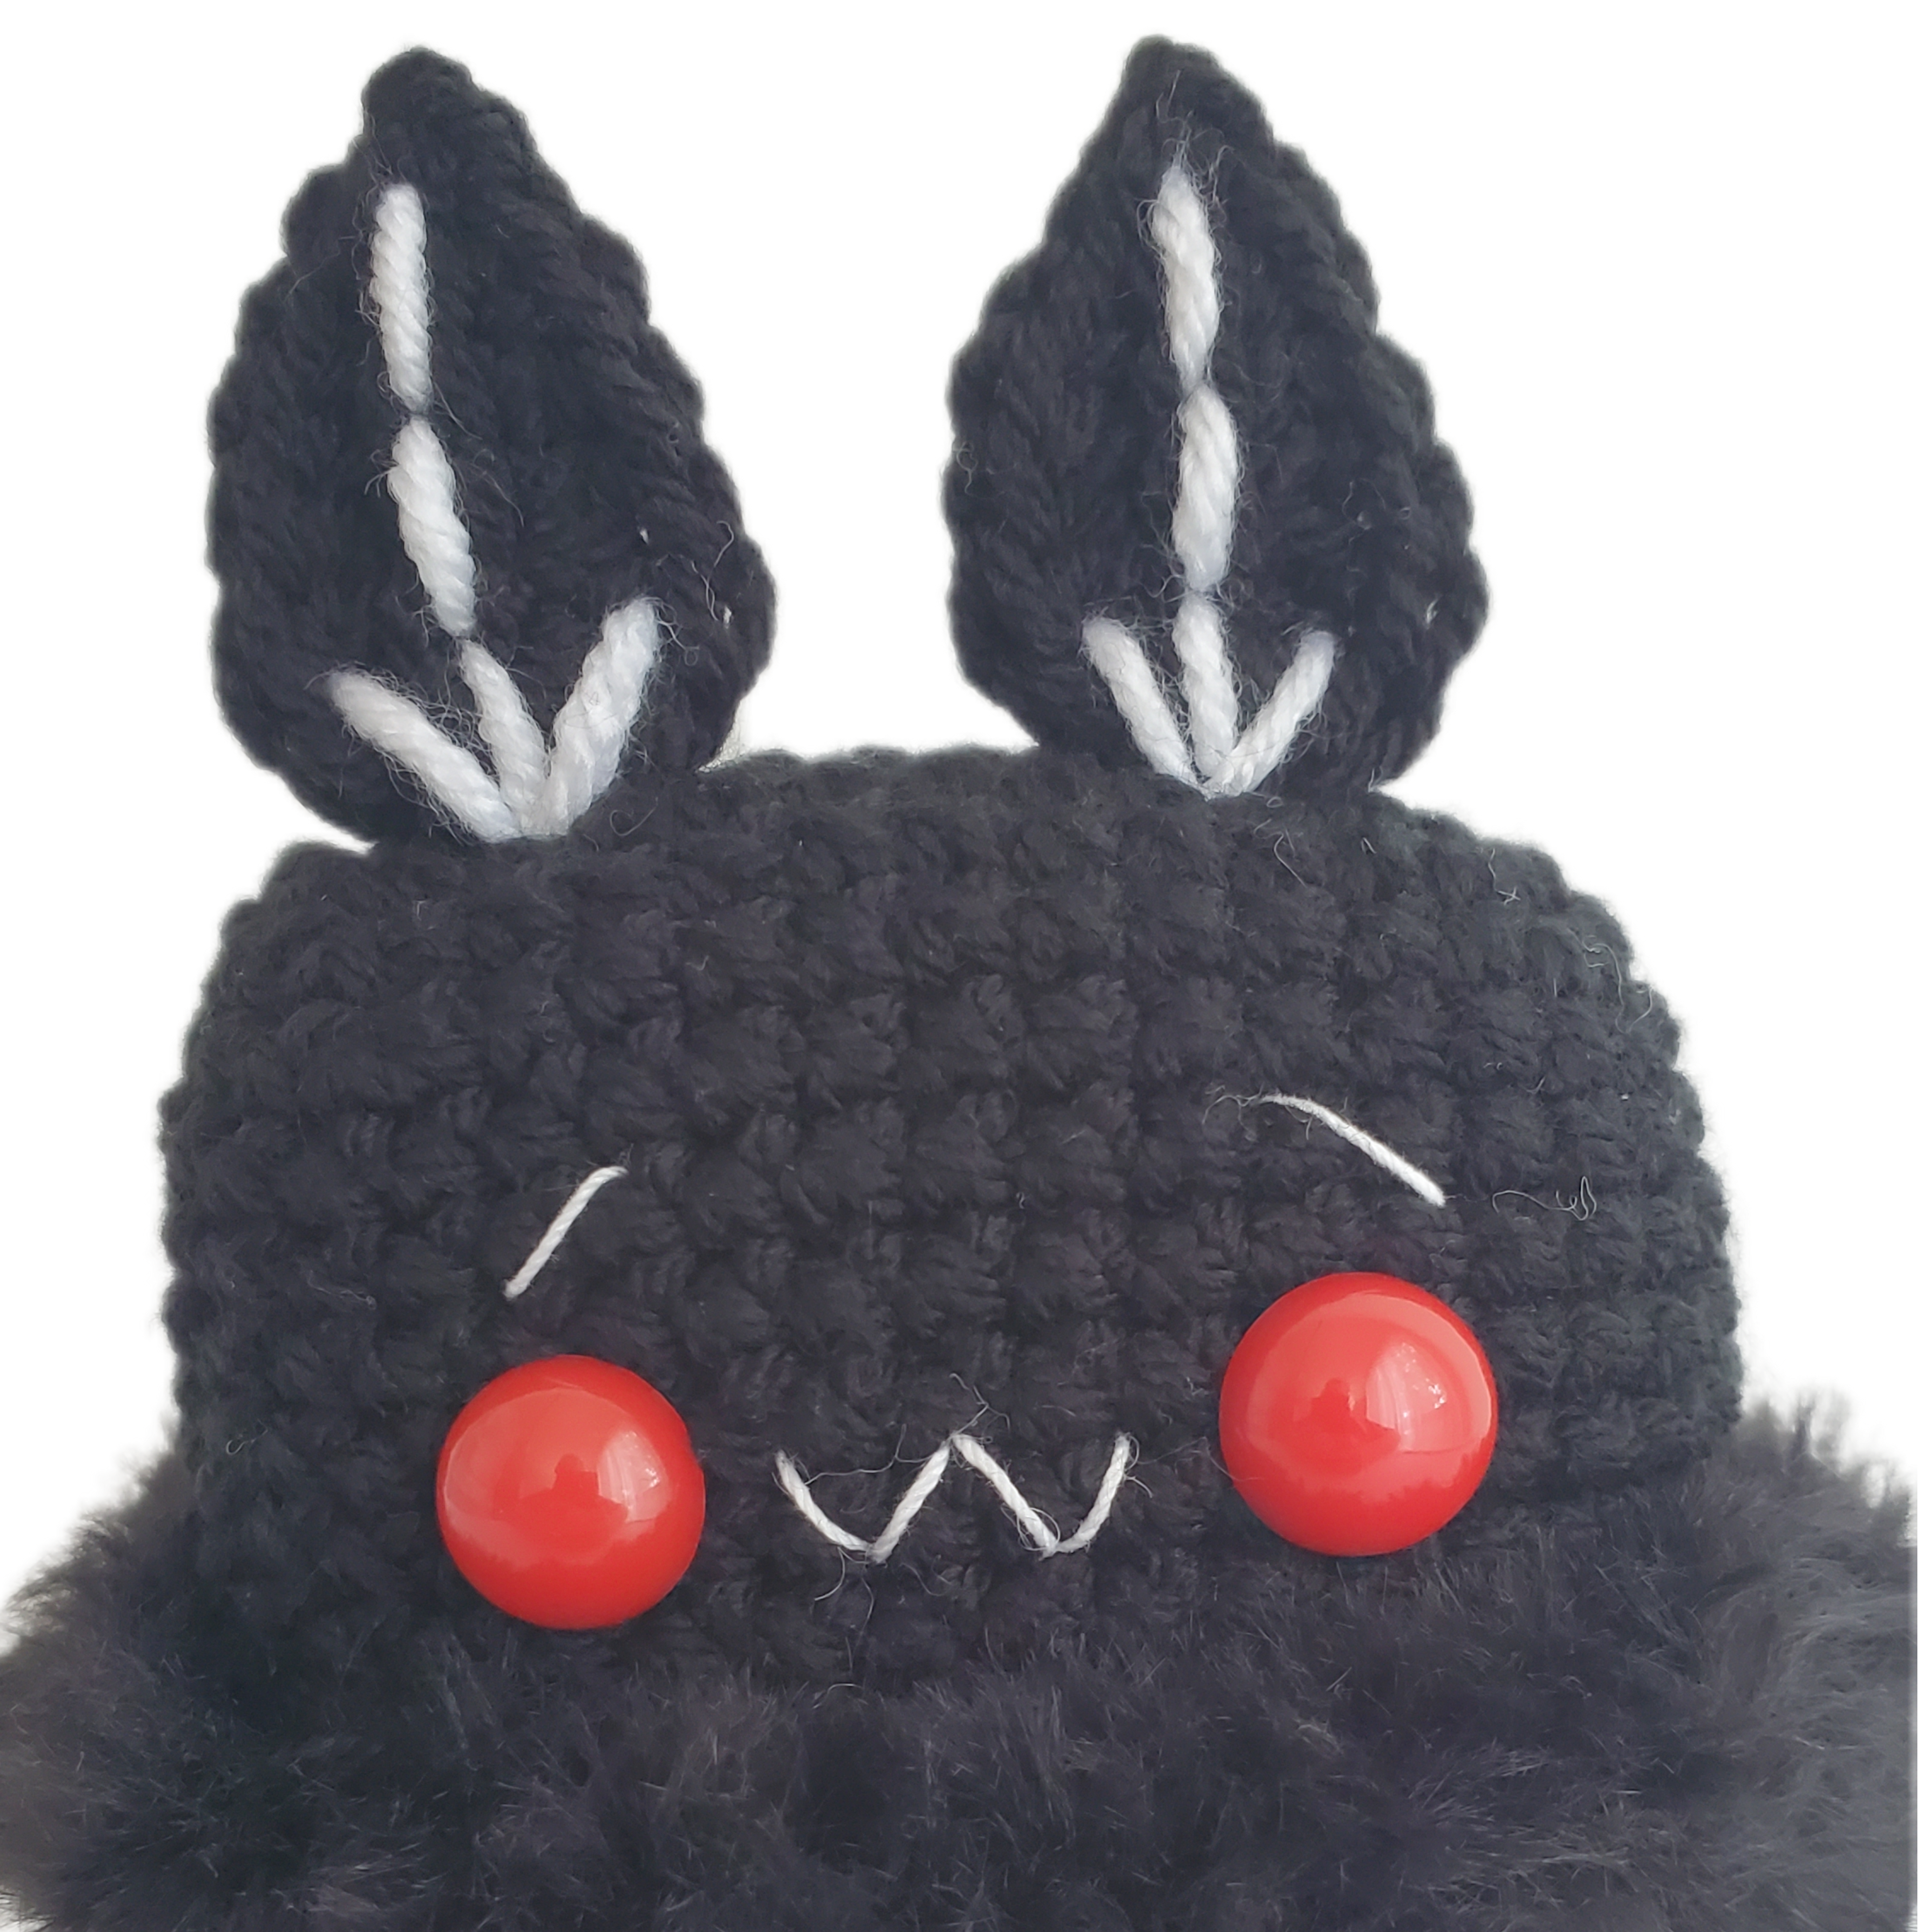
Then, for the face details – using some white embroidery floss, add a “W” shape between the eyes. Once that’s sewn, we can add the eyebrows with the same length of white. They angle downwards, approx. 2 rnds above each eye. I’ve got a really nice photo just above here to help guide you on the face details in addition to the video tutorial!
Ruff
Begin by flipping your Mothman over so you’re looking at the backside, and turn him so his head is facing down. You’ll want to fasten on with your hook pointing towards his legs! Then, with black faux fur yarn, insert your hook into any FLO from Rnd 12 on the body, and fasten on.
Place 1 sc st in each FLO around, weaving in your fasten on tail as you work. Once you’re all the way around, slp st to the top of your first sc st, and cut a short tail. Weave the short tail in and trim any excess.
Note: I use a slicker brush to brush the ruff at this point. I gently brush all the way around, then go back around and brush up the ruff to really fluff it up. You don’t need to do this! But I find single crocheting with the faux fur tends to bunch it up, and I love how the ruff looks when it’s super fluffed up. 💕
Wings, make 2!
With black yarn, ch 14 sts.
Row 1: in the 4th st from your hook, 1 dc, then working down the ch, 6 dc, 4 sc. Ch 1, then turn.
Row 2: 4 sc (turning ch counts as 1st st here and throughout), 6 dc, leave remaining sts unworked. Ch 1, then turn.
Row 3: 10 sc across row. Ch 1, then turn.
Row 4: 4 sc, 4 dc, leave remaining sts unworked. Ch 1, then turn.
Row 5: 8 sc
Fasten off by cutting a long tail to sew with, YO, and pulling tail through last loop on hook.
Use this tail to attach each wing to the back of the body, weaving in all ends.
Complete!
As always, thanks for tuning in. If you haven’t already checked out my YouTube page, I’d be forever grateful if you’d consider subscribing or watching my other tutorial videos. I try to post twice a month with a new tutorial!
Normal, obligatory legal banter:
Please, if you’d like to share this pattern, link folks directly to this blog page, or to the video on YouTube. I work really hard on my patterns and post them for free – please don’t copy my stuff and sell it as your own pattern! You can make and sell items made from this pattern – and while I would love a mention on the listing or a link back to my blog, it’s not a requirement.
Have an Instagram and want to post your new make? Tag me (@pixeledpeach) so I can see and promote your page!


